Wednesday, August 23, 2017


Sadly, on August 14th 2016 I lost my home in a fire. Also, lost was all the plans/history/logs for the Playmate Project, including the tail feathers that I had rebuilt.  Without the plans and logs, I see no feasible forward path for the project so I'm going to part it out.

Now accepting offers on:
1.  The entire project, airframe, gear etc...


2.  Engine Only - ENGINE HAS BEEN SOLD

The engine is a Lycoming A2B with approximately 400 hours on it.   The logs are lost but compressions and other verifiable characteristics are consistent with it's time.

I plan on starting it up and posting a demonstration video as soon as I get my ignition switch replaced (the keys were in my home fire).


Monday, March 29, 2010

Round 2...Trailer versus airplane.


Airplane wins! Finally, after raising the c-channel up 4.5 inches, covering the center channel and putting the axles back under the springs I have loaded the airplane. Now what? Well, I'm going to put the airplane in a boat storage unit for a bit so that I have room to clean my shop and start working on covering the wings.

Wednesday, March 24, 2010

Ugh!


Well after carefully measuring the landing gear to make sure it would fit on the trailer, it became clear while loading for the first time that I failed to account for the folding wing. All the tracks will have to be raised four and a half inches. So here's the new plan. I'm going to fill in the center track and make a solid deck and then cut down a 5x5 to be 4 1/2" on one side to use as a spacer for the side tracks on the left. It's frustrating how much lost work and time went into making that center track so low.
Unfortunately, the folded wings also stick up over 10' tall on the trailer. I guess my best fix will be to put a block under the front wheel once the plane is loaded to drop the back wings.


Tuesday, March 23, 2010

Notes from the original builder.

I was able to track down the original builder Derek Reed. Looking at the blueprints he had to work with and reading through how he built the Playmate, I think Derek must have been an amazing man and I would love to meet him someday. Here's an excerpt of it's construction in his own words:

As far as I can recall it took about three years of spare time to make the Playmate.
It was started in the family room of the house we had at Redondo Beach CA..
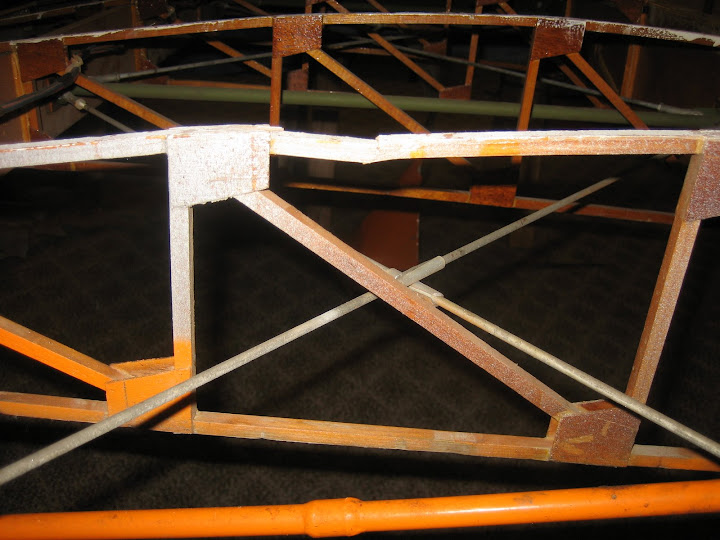
All of the gas welding for the fuselage was done on a plywood table that I made along one side of the family room.
The initial welding instruction was given by Ted Greenlaw who was my flight instructor at Peninsular Aviation at Torrance Airport.
Ted was killed some years later flying supplies into I think Korea.?
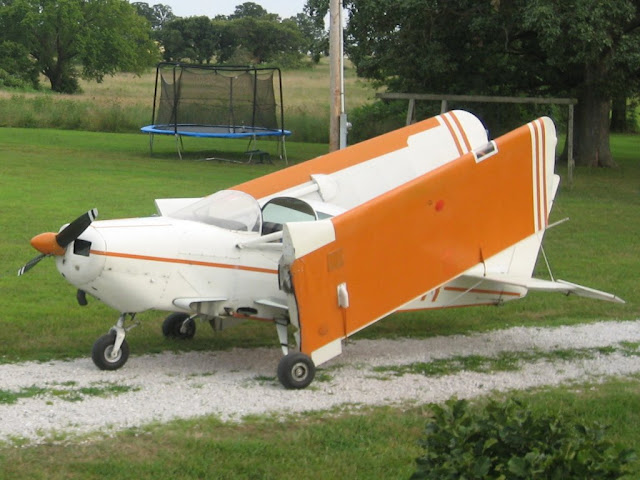
I chose the Playmate as I was sharing a hanger and the folding wings made it possible to get two planes into that hanger.
During the construction Ray Stits did not prove to be of any assistance. His take was that if you couldn't read his plans you shouldn't be building his plane. !
One of the biggest challenges was the folding wing mounting brackets to the fuselage. getting the three bushings to line up was a chore, I must have made at least 6 pairs of mounting brackets before I got one to line up.
It was covered in 3,7 oz Dacron purchased from Burlington Mills back east.
I used the Stits covering process and painted it with Douglas aircraft surplus poly paint.
To get the fuselage and wings out of the house I conned my wife into letting me knock out one wall of the house, and my neighbor agreed to let me take the fences down between our two houses.
That gave me access to the alley at the back and into the garage.
Engine decking and final painting was done in the garage. The engine was purchased as a run out from Nagel Aircraft ,Torrance Airport for the princely sum of $800.and subsequently rebuilt by Northrop in Hawthorne.
At this point we moved to Torrance and I built a trailer to carry the plane on.
The initial flights were made from Chino airport, there were the usual hiccups, i.e....the trim tab was connected backwards..which made the first flight interesting. the engine had the wrong carb ,it had a smaller venturi which starved the engine of power WOT.[on the first flight].
The nose gear had a terrible shimmy which necessitated replacing it with a Metco Air unit and recalculate the W and B.
I don't recall how long I kept the Playmate, but sold it and bought a 1965 Mooney that had 350 hrs use in ~15 years sitting at Torrance tie down. That proved to be a great plane.

Covering and primer of left elevator

I've been working on the left elevator which is the last piece of the horizontal tail surface to be covered painted with primer. The last pic is with a full cross coat applied. The Stewart Systems glue and primer are water based so I can safely do it in my kitchen.


Well the trailer is finally ready for testing...I'll post an entry with photos of the loaded plane if successful. Wish me luck.


Thursday, February 25, 2010

Airplane Trailer


I've been working on an airplane trailer so I can haul my project out of the shop when needed and put it in storage. This will free me up some space to re-cover my wings and remove some of the clutter in the shop and will also take the Playmate to and from the airport when it is ready to fly. It originally started out as a very rusty boat trailer. I wish I'd taken a picture of it before the repainting as the restoration was rather dramatic. My father and I stripped it down to bare metal, and applied rust conversion coating where necessary, primed and re-painted. Left to complete are: painting the C-channels, mounting the center for the nose wheel, building the ramps and putting on the decking. If I get around to it, I'd also like to mount a fuel tank to refuel while at the airport however, that's pretty low on the priority list presently.


Elevator Trim


So I decided to upgrade the manual elevator trim. Not only was I concerned about the safety, it was just a bulky solution both in the cockpit and at the elevator. The basic concept looked like a lawn mower throttle assembly. The old assembly moved kind of rough and when you pushed on the lever the inner wire would flex before it went into the conduit. For my solution, I bought an RAC servo system from Aircraft Spruce and will likely put the adjustment buttons on the top of the stick. For now, I'm just creating the servo tray so that I can cover the left elevator. The servo tray is made out of aluminum angle with some bends cuts and rivets. I was pretty happy with the result especially since I didn't have any plans to guide me.


Wednesday, August 19, 2009

I ripped off the left wing....


Ok not ripped, but carefully removed. It was quite a site with my father, myself and my pregnant wife trying to maneuver around a horribly messy shop. I put it in the shop apartment for painting and covering. So far I've removed the old fabric, aileron bracing and lights. I guess I should build a wing rotisserie for covering and painting but I have no clue how I'd actually attach it to the wing.
There was a couple of broken ribs, but overall, it looks pretty good for something started in the late 60's. The internal bracing has some slight corrosion which I plan on using rust reformer and then a new top coat. I ordered some 5/16th spruce and plywood from Aircraft Spruce. Dianna...if your reading this...don't freak out it was cheap. ;-)

Selecting the covering system

A question I often get is how can I cover a Ray Stits (origional founder of Stits/Polyfiber) with the Stewart Systems products. Frankly, it started out as a difficult decision as I was initially concerned about going with a somewhat less tested newer system versus a tried and true Polyfiber process. What attrated me to Stewart Systems was the promise of safer chemicals. When researching urethane processes I read about the dangers of isocyanides in the solvents. Stewart Systems side steps the process by replacing the role of solvents with water which makes them much less reactive with skin and reduces the vapors. I was going to have to spend about $500 for a good forced air respirator just to get started. Now I'm able to get by with a standard charcol variety.

Still concerned about a new process, I decided to enroll in one of the seminars to learn the process and also get the opportunity to talk with others who have used the system. I must say it was a great experience that I'd highly recommend to anyone thinking about doing their on re-cover of a tube/rag airplane. The class was hosted by Aircraft Finishing Systems. A retailer owned by Marvin Haught and taught by Jason Gerard a Stewart representative. Marvin was very accommodating and even put me up for the night in a finished portion in the hanger. Jason proved to be an excellent teacher as my sample panel turned out beautifully and I left with the confidence needed to do the rest of the project.

Sufficed to say, I'm sold on the products. (no I don't sell them myself). The glue and the UV barrier can be cleaned up with water and I find myself doing much of the work in the house for the luxury of heating and air conditioning.
I work on one panel at a time and clean up nightly or at least when I get the better clean that up stare from the wife. There are no noxious fumes until you get to spraying the top coats of EkoFill and urethane which then only takes a standard charcoal respirator.